Updating Wordpress Plugins
If you're running a WordPress site and wondering how to update WordPress plugins, you're in the right place. Keeping your plugins up to date isn't just good practice - it's essential for security, performance, and making sure everything actually works. Yet loads of WordPress users put this off because they're worried about breaking something or they simply don't know where to start.
Here's the thing: updating WordPress plugins is genuinely straightforward once you understand the process. Whether you prefer automatic updates or want full control with manual methods, this guide will walk you through exactly what you need to do to keep your site safe and running smoothly.
Why You Need to Update WordPress Plugins Regularly
Before we get into the how, let's talk about why this matters because understanding the "why" makes you more likely to actually do it.
Security is the big one. Outdated plugins are one of the main ways hackers get into WordPress sites. When developers release updates, they're often patching security vulnerabilities that have been discovered. If you don't update the plugin, you're leaving a door open for anyone who knows where to look. This is particularly crucial if you're running an ecommerce site where customer data is at stake.
Then there's compatibility. WordPress itself gets updated regularly, and plugins need to keep up. An older version of a plugin might work fine until you update WordPress core, and then suddenly your contact form stops working or your site layout breaks. Plugin updates ensure everything works together properly.
You also get new features and bug fixes. Developers are constantly improving their plugins, adding useful functionality and fixing annoying issues. By not updating, you're missing out on improvements you've probably already paid for if you're using premium plugins.
Performance matters too. Updates often include code optimisations that make plugins run faster and use fewer server resources. This means quicker load times for your visitors, which Google cares about for rankings and your users appreciate. If you're serious about site speed optimisation, keeping plugins updated is part of that equation.
Understanding WordPress Plugin Updates
WordPress has built an update system directly into the dashboard. When there's an update available for any of your installed plugins, you'll see a notification with a number badge next to "Plugins" in your admin menu.
The WordPress plugin directory (where free plugins live) makes this process simple. When a developer releases an update, WordPress checks your version against the latest version and tells you when you need to update. For premium plugins from third-party sources, the process is similar, though some require you to enter a licence key for automatic updates to work.
Since WordPress 5.5, there's also an automatic update system for plugins. You can choose to have specific plugins update themselves automatically, or you can keep full control and manually update everything yourself.
How to Check Which Plugins Need Updating
Before you start updating, you need to know what needs attention.
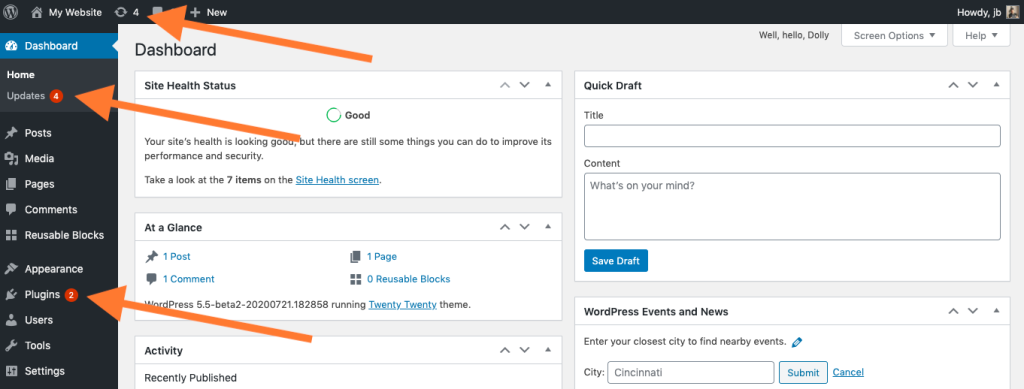
Go to your WordPress admin area and look at the left sidebar. If you see a number in a circle next to "Plugins," that's how many updates are waiting. Click through to the Plugins page, and you'll see your full list of plugins with "Update Available" or "Update Now" showing next to any that need updating.
You can also check the Dashboard home screen. WordPress shows plugin and theme updates right there in the "At a Glance" section or in a dedicated updates widget.
For a complete overview, navigate to Dashboard > Updates. This page shows everything that needs updating on your site - WordPress core, plugins, and themes all in one place. This is genuinely the easiest way to see the full picture of your wordpress updates.
Method 1: Update WordPress Plugins Automatically
The automatic update feature is brilliant if you want a hands-off approach, though it's not right for everyone or every situation.
Here's how to enable automatic updates for specific plugins:
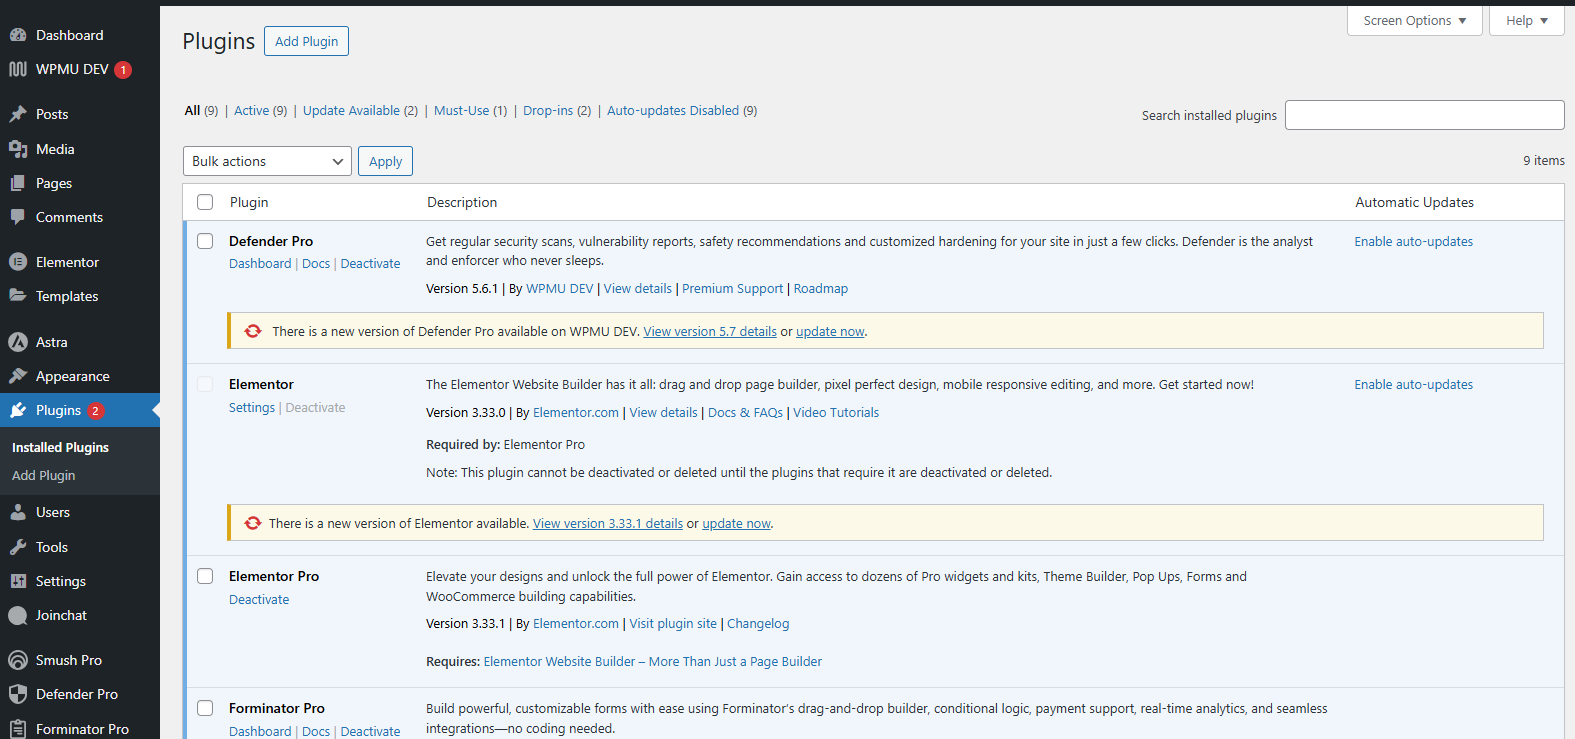
Go to Plugins > Installed Plugins in your WordPress dashboard. Find the plugin you want to update automatically. Look for the "Enable auto-updates" link below the plugin name. Click it, and that plugin will now update itself whenever a new version is released.
You'll see the link change to "Disable auto-updates," so you can turn this off anytime. The plugin will show "Auto-updates enabled" to confirm it's set up.
To enable automatic updates for multiple plugins simultaneously:
From the Plugins page, use the tickboxes on the left to select the plugins you want to set to auto-update. Use the "Bulk actions" dropdown at the top, select "Enable auto-updates," and click "Apply." This saves loads of time if you're managing many plugins.
What you need to know about automatic plugin updates:
They happen in the background without you doing anything. You'll get email notifications when updates occur, so you'll know what's changed. This works brilliantly for straightforward plugins from trusted developers that rarely cause conflicts.
However, automatic updates can occasionally break things if there's a compatibility issue with your theme or other plugins. That's why experienced WordPress users often avoid enabling automatic updates for complex plugins or ones that control critical site functions. For basic plugins from the official WordPress plugin directory that you trust, automatic updates are usually safe and convenient.
Method 2: Manually Update WordPress Plugins from the Dashboard

Manual updates give you full control over when and what you update. This is the method most people use because it lets you test things properly.
To update a single plugin:
Go to Plugins > Installed Plugins. Find the plugin with an update available - it'll have "Update Now" showing below its name. Click "Update Now" and wait whilst WordPress downloads and installs the new version. You'll see a success message when it's done.
The plugin stays activated throughout the update process, so your site keeps working normally (though there's a brief moment during installation where the old version is replaced).
To bulk update multiple plugins:
From the Plugins page, tick the boxes next to the plugins you want to update. You can tick the box at the very top to select all plugins if you're updating everything. From the "Bulk actions" dropdown, select "Update" and click "Apply."
WordPress will update the plugins one by one. You'll see the progress, and it tells you which plugin it's working on. This bulk update method is much faster than updating each plugin individually when you've got several waiting.
One important note: Before you use bulk update, quickly scroll through the list and check if any plugins are showing major version changes (like going from 2.9 to 3.0). Big version jumps sometimes include breaking changes, so you might want to update those individually and check your site afterwards.
Method 3: Update a Plugin via FTP
Sometimes the dashboard update fails, or you can't access your WordPress admin. That's when updating via FTP becomes necessary.
You'll need:
- FTP client software (FileZilla is free and works on Windows, Mac, and Linux)
- Your FTP credentials (hostname, username, password, and port - usually in your hosting control panel)
- The latest version of the plugin downloaded from the WordPress plugin directory or the developer's site
Here's the process:
Download the new plugin version as a ZIP file. Extract it on your computer so you have the plugin folder. Connect to your site using your FTP client with your credentials.
Navigate to /wp-content/plugins/ on your server. Find the folder for the plugin you're updating. This folder will have the same name as the plugin (like contact-form-7 for Contact Form 7).
Before you do anything else, download a backup copy of the current plugin folder to your computer. This is your safety net if something goes wrong.
Delete the old plugin folder from the server (or rename it to something like old-plugin-name if you're nervous about deleting). Upload the new plugin folder you extracted earlier to the /wp-content/plugins/ directory.
Once the upload finishes, check your WordPress site to make sure everything works. If the plugin needed to be activated, go to your Plugins page and activate it.
This method requires more technical confidence, but it's genuinely useful when automatic updates fail or you're locked out of your dashboard for some reason. If you're not comfortable with this level of technical SEO work, it might be worth getting professional help.
Method 4: Update Plugins Using WP-CLI
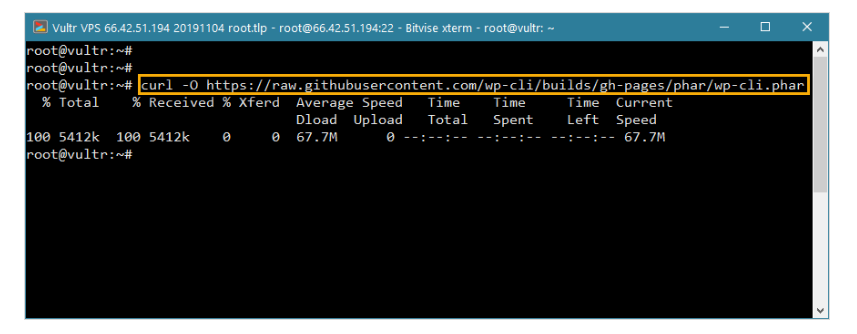
If you're comfortable with command line interfaces, WP-CLI offers the fastest way to update plugins, especially if you manage multiple WordPress sites.
WP-CLI is a command line tool for WordPress that many hosting providers include by default. Check with your host about accessing SSH and whether WP-CLI is installed.
To update all plugins at once:
Connect to your server via SSH. Navigate to your WordPress installation directory. Run this command:
wp plugin update --all
That's it. Every plugin with an available update will be updated automatically.
To update a specific plugin:
wp plugin update plugin-name
Replace plugin-name with the actual plugin's directory name (the folder name in /wp-content/plugins/).
To see which plugins need updating first:
wp plugin list
This shows all your installed plugins with their status and whether updates are available.
WP-CLI is brilliant for developers and anyone managing multiple sites because you can script these updates and run them across several sites quickly. It's probably overkill if you're just managing one simple site, but it's worth knowing about.
Best Practices for Updating WordPress Plugins Safely
Here's what you should do every time to avoid problems.
Always back up your site first. This isn't optional - it's essential. If an update breaks something, you need to be able to roll back quickly. Many hosting providers include automatic backups, but check they're actually working. Otherwise, use a backup plugin like UpdraftPlus or BackWPup. If you're working with a web design and development agency, they should handle this as part of your WordPress website maintenance.
Test updates on a staging site if you can. A staging site is a copy of your live site where you can test changes safely. Many hosting providers now include staging environments. Update the plugins there first, check everything works, then do the same updates on your live site. This is especially important for major updates or if you're running an ecommerce site where downtime costs money.
Update one plugin at a time when possible. If you update everything in bulk and something breaks, you won't know which plugin caused the problem. Updating individually means you can check your site after each update and identify issues immediately.
Read the changelog before updating. Most plugins include update information that tells you what's changed. Look for mentions of "breaking changes" or "requires PHP 7.4+" or similar warnings. These changelogs often appear right in the WordPress dashboard before you update.
Check your site after updating. Don't just click update and walk away. Browse your site, test forms, check your shop checkout process - whatever's important for your site. Do this immediately whilst you know which plugin you just updated.
Keep WordPress core updated too. There's no point keeping plugins updated if your WordPress version is out of date. WordPress core updates include security patches and compatibility improvements that make plugins work better. This is a fundamental part of WordPress security.
Don't keep deactivated plugins installed. If you're not using a plugin, delete it. Deactivated plugins still need updating because they can still create security vulnerabilities. Either use it or remove it.
What to Do When a Plugin Update Breaks Your Site
Sometimes updates do cause problems. Here's what to do.
First, don't panic. Most issues are fixable quickly.
If you notice a problem immediately after updating a specific plugin, the quickest fix is to deactivate that plugin. Go to Plugins > Installed Plugins, find the problem plugin, and click "Deactivate." Your site should return to normal.
Check if there's a newer version already. Sometimes developers release a quick patch when an update causes widespread problems. Refresh the Plugins page and see if another update is already available.
Roll back to an older version of the plugin. You can download previous versions from the WordPress plugin directory. On the plugin's page in the directory, click the "Advanced View" link on the right sidebar, then scroll down to "Previous Versions." Download the old version, deactivate the current version, delete it, then install the older version manually.
If you have a backup (you do have a backup, right?), you can restore your whole site to before the update. This is the nuclear option but sometimes necessary if the update caused major problems you can't quickly fix.
Contact the plugin developer. If you're using a premium plugin, contact their support team. For free plugins, check the support forum on WordPress.org. Often someone else has already reported the issue and there's a workaround.
Check for plugin conflicts. Sometimes the issue isn't the updated plugin itself but a conflict with another plugin. Deactivate all other plugins, then reactivate them one by one to find the conflict.
Managing Updates for Premium and Third-Party Plugins
Premium plugins (ones you've paid for) work slightly differently from free plugins in the WordPress plugin directory.
Most premium plugins require you to enter a licence key before updates work automatically. You'll usually do this in the plugin's settings page after installation. Once activated, the plugin will check for updates just like free plugins, and you'll see update notifications in your dashboard.
Some premium plugin developers use their own update systems that work outside the standard WordPress update process. You might need to download updates from their website and install them manually via FTP or the plugin upload feature.
Always keep your licence active. If your licence expires, you'll usually stop receiving updates even though the plugin keeps working. For security plugins and anything critical, keeping your licence active matters because you need those security updates.
Third-party plugin marketplaces like CodeCanyon work differently too. These plugins often come as standalone ZIP files. To update them, you'll need to download the new version from the marketplace, then either upload it through WordPress or replace it via FTP. There's usually no automatic update notification.
Troubleshooting Common Plugin Update Issues

"Update failed" messages: This usually means a permissions issue or a conflict. Try updating via FTP instead, or contact your hosting provider because they might need to adjust file permissions.
Site goes down completely: This is rare but scary. First, try accessing /wp-admin/ directly. If you can get in, deactivate the problem plugin. If you can't access the admin at all, connect via FTP and rename the plugin folder in /wp-content/plugins/ to deactivate it.
White screen after updating: This often means a PHP error. Check your error logs (usually in your hosting control panel) to see which plugin caused it. Deactivate that plugin via FTP by renaming its folder.
Update keeps saying it's available even after updating: Clear your browser cache and WordPress object cache if you're using a caching plugin. Sometimes the notification just needs to refresh.
Can't update because of low disk space: Your server is full. Delete old backups, unused themes, and deactivated plugins. Contact your host if you're consistently running out of space.
How Often Should You Update WordPress Plugins?
There's no single right answer, but here's a sensible approach.
Security updates should happen immediately. If an update mentions security fixes, don't wait. Security vulnerabilities get exploited quickly once they're known about.
For everything else, update at least monthly. Set a recurring calendar reminder to check for updates. Monthly is a good balance between staying current and not spending all your time updating.
Check more frequently for critical plugins. If a plugin handles payments, user data, or security, check weekly or enable automatic updates if you trust the developer.
Don't wait too long between updates. If you let many plugins get several versions behind, updating becomes risky because you're making multiple changes at once. Regular small updates are safer than occasional massive ones.
Tools and Plugins That Help Manage Updates
Several plugins exist specifically to make managing WordPress plugin updates easier.
MainWP and similar management plugins let you update multiple WordPress sites from one dashboard. Brilliant if you manage client sites or run multiple sites yourself.
WP Rollback lets you quickly roll back to an older version of a plugin directly from the dashboard if an update causes problems. It's like having insurance for updates.
Easy Updates Manager gives you fine control over what updates automatically and what requires manual approval. You can set different rules for different types of updates.
UpdraftPlus and other backup plugins can create automatic backups before updates happen, so you always have a restore point.
That said, for most single-site owners, you don't need extra plugins. The built-in WordPress update system works perfectly well once you understand it.
Keeping Your WordPress Site Healthy Long-Term
Updating plugins is just one part of maintaining a healthy WordPress site.
Keep your WordPress version current. Core updates matter as much as plugin updates for security and compatibility.
Use fewer plugins overall. Every plugin you add is another thing to maintain and update. If you're not actively using a plugin, delete it. Be ruthless about this.
Choose plugins carefully in the first place. Before installing a new plugin, check when it was last updated. If it hasn't been updated in over a year, that's a warning sign. Look at the support forum too - are questions being answered?
Consider who maintains your plugins. Established developers with multiple popular plugins are more likely to keep everything updated. Individual developers making free plugins sometimes abandon them.
Check your plugin compatibility before major WordPress core updates. When WordPress announces a new version, plugin developers usually update their plugins to confirm compatibility. Wait a few days after a major WordPress release before updating, so plugin developers have time to test.
If you're running a business website, consider working with a professional SEO agency or digital marketing agency that includes WordPress maintenance as part of their service. They'll handle the technical side whilst you focus on running your business.
Final Thoughts
Updating WordPress plugins properly isn't complicated, but it does require some discipline and attention. The peace of mind from knowing your site is secure and running the latest stable versions is worth the small amount of time this takes.
Start with the method that feels most comfortable - for most people, that's manually updating from the dashboard. As you get more confident, you might enable automatic updates for trusted plugins or explore command line tools if you manage multiple sites.
The key thing is to actually do it regularly. Set that calendar reminder, make it part of your monthly routine, and your WordPress site will stay secure, fast, and problem-free.
Your next steps: Go check which plugins need updating right now. Create a backup if you don't have a recent one. Update your plugins one by one, testing your site after each update. Then set a reminder to do this again in a month. That's genuinely all it takes to properly update WordPress plugins and keep your site running smoothly.
If you need help with your WordPress site maintenance or want to discuss a comprehensive SEO strategy that includes technical optimisation, get in touch with our team to see how we can help keep your site performing at its best.